Here are several exercises using the Binary Editor to create and modify
images. As a brief reminder: in class we used the Editor to
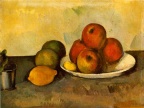
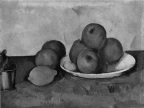
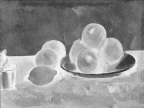
(i) create a grayscale version of a color image, by averaging the byte
samples in groups of 3;
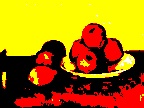
(ii) create a version of the image in which 1 bit was used to represent
each of the three color values, by setting the blue, red and green
levels to either 255 or 0;
(iii) create a color negative of the image, by subtracting each sample
value from 255.
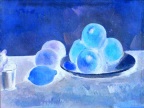
We also saw how to darken or brighten an
image, by multiplying every pixel value by a number greater than 1 (for
brightening) or less than 1 (for darkening).
The first two exercises below ask you to synthesize color images from
scratch by setting the byte values directly. The next ask you to
modify images. For the modification, you can choose any images
that you find on your computer or on the Web, but you must save them in
.bmp format before modifying them with the Binary Editor. If you
have a Windows computer, you can use the Paint program to convert from
.jpg or .gif format to .bmp. If you have a Mac, you can use the
Preview program to convert.
By the way, in this assignment you should never use the 'Display in
Grayscale' option in the Binary Editor---you should always display in
color.
1. Create an image that is all black except for a white horizontal line
across the center.
2. Create an image that is all black except for a white vertical line
across the center.
3. Create a grayscale negative of a color image you find on the
Web. (Don't use the one displayed in these examples.)
4. Create a black and white monochrome version of a color image that
you find on the Web.
5. (a little harder) Increase the contrast of an
image. An extreme version of this is one-bit-per-color image
shown above (the third image on this page). A more moderate
version would set, say, every byte value less than 64 to 0, every byte
value greater than 192 to 255, and replace each intermediate byte value
b by 2 x (b-64). This has the effect of making the light areas
lighter and the dark areas darker. If you want, you can
experiment with other values. You can also try to decrease the
contrast.
6. This exercise requires you to use a fairly small image, no more than
200 x 200 pixels, since the Select operation takes too long with a
large one. It's better also if you make sure that the width is a
multiple of 3. Take the color image, convert it to grayscale as above,
and then select every third value. Before you try to display it,
think hard about what will happen if you (a) display it at the original
width of the image; (b) display it at one-third the original
width. Then see what actually happens. Try to explain the
result.
What to hand in: All the images you create should be saved as
.bmp files, using the image save option in the Binary Editor, then
converted to .jpg format, then placed in a folder. You should
also put in the folder your explanations of EXACTLY how you
created/modified the images, as well as the explanation of what you
observed in Exercise 6.